Connect to arbitrary ssh port number with virt-manager

So I was away from my virtualization environment but I wanted to connect to it tunneled through ssh!

I jumped through my bastion server and forwarded a port to the virtualization host.

ssh -L 5022:vm3.ipa.example.com:22 home

Where home is just an alias in ~/.ssh/config:

Match host home
   Hostname www.ipa.example.com
   Port 6022
   User bgstack15

And virt-manager doesn’t have a way to let you configure port number in a custom connection string, but you can do it from the command line:

virt-manager -c 'qemu+ssh://myuser@localhost:5022/system?keyfile=id_rsa'

Upon first connection you have to accept the new/unknown ssh host key so you probably need package ssh-askpass-gnome.

References

Weblinks

  1. Ripped directly from https://fabianlee.org/2019/02/16/kvm-virt-manager-to-connect-to-a-remote-console-using-qemussh/

Search expressions

  1. libvirt qemu+ssh custom port

Use virt-install to fully automate the install for Devuan with preseed

I recently discovered how to use a Debian preseed file while building a VM in kvm. After hand-crafting my Devuan preseed file, here it is in all my customized and I’m sure duplicate-filled and bogus-answer-encrusted glory.

How I use this

I define a variable, and plug it into the important parts.

vm=d2-04a ; time sudo virt-install -n "${vm}" --memory 2048 \
   --vcpus=1 --os-variant=debiantesting -v \
   --disk path=/var/lib/libvirt/images/"${vm}".qcow2,size=20 \
   -l /mnt/public/Support/SetupsBig/Linux/devuan_ascii_2.0.0-beta_amd64_DVD.iso \
   --initrd-inject=/mnt/public/Support/Platforms/devuan/preseed/preseed.cfg \
   --extra-args "hostname=${vm} NOTIFYEMAIL=bgstack15@gmail.com interface=auto" \
   --debug --network type=bridge,source=br0 --noautoconsole

Some thoughts

For some reason I was unable to get the preseed to work with the non-beta Ascii iso. When I started the preseed vm activity, I already had the beta disc so I was using it first before I downloaded the release disc, which didn’t even work. So I reverted to the beta disc. Please share any results, working or otherwise, you have when trying this with the release disc.
I do some tricky stuff in here with grub and the ceres release. Apparently consolekit messes with some of the files grub wants to lay down in /boot (having to do with locales), so I had to create this complex solution. I don’t even care that it’s “grub-legacy.” It seems a little simpler for a simpler time, and also works, so why bother doing anything different?

The preseed file

# File: /mnt/public/Support/Platforms/devuan/devuan-preseed1.txt
# Locations:
#    /mnt/public/Support/Platforms/devuan/devuan-preseed1.txt
# Author: bgstack15
# Startdate: 2019-06-25
# Title: Kickstart for CentOS 7 for ipa.example.com
# Purpose: To provide an easy installation for VMs and other systems in the Mersey network
# History:
#    2017-06 I learned how to use kickstart files for the RHCSA EX-200 exam
#    2017-08-08 Added notifyemail to --extra-args
#    2017-10-29 major revision to use local repository
#    2019-06-25 fork from centos7-ks.cfg
# Usage with virt-install:
#    vm=d2-04a ; time sudo virt-install -n "${vm}" --memory 2048 --vcpus=1 --os-variant=debiantesting -v --disk path=/var/lib/libvirt/images/"${vm}".qcow2,size=20 -l /mnt/public/Support/SetupsBig/Linux/devuan_ascii_2.0.0-beta_amd64_DVD.iso --initrd-inject=/mnt/public/Support/Platforms/devuan/preseed/preseed.cfg --extra-args "hostname=${vm} NOTIFYEMAIL=bgstack15@gmail.com interface=auto" --debug --network type=bridge,source=br0 --noautoconsole
#    vm=d2-04a; sudo virsh destroy "${vm}"; sudo virsh undefine --remove-all-storage "${vm}";
# Reference:
#    https://sysadmin.compxtreme.ro/automatically-set-the-hostname-during-kickstart-installation/
#    /mnt/public/Support/Platforms/CentOS7/install-vm.txt
#    https://serverfault.com/questions/481244/preseed-command-string-fail-with-newline-character-using-virt-install-initrd-inj
#    https://www.debian.org/releases/stable/i386/apbs01.html.en
#    https://github.com/jameswthorne/preseeds/blob/master/debian-7-wheezy-unattended.seed
#    syntax for --location https://www.queryxchange.com/q/1_908324/virt-install-preseed-not-working/
#    example preseed https://www.debian.org/releases/stable/example-preseed.txt
#    skip next dvd question https://unix.stackexchange.com/questions/409212/preseed-directive-to-skip-another-cd-dvd-scanning
#    grub problem caused by consolekit:amd64 https://bugs.debian.org/cgi-bin/bugreport.cgi?bug=915947#10
#    https://stackoverflow.com/questions/39861614/how-to-fully-automate-unattended-virt-install
#    https://www.debian.org/releases/stable/i386/apbs03.html.en
#    https://dev1galaxy.org/viewtopic.php?id=1853
#    https://www.cyberciti.biz/faq/howto-setup-serial-console-on-debian-linux/
# Improve:
#    discover how to send email, using postfix or sendmail. Don't care which, but exclude exim4.
#    echo "$( hostname ) has IP $( ip -4 -o a s eth0 | awk '{print $4}' | sed -r -e 's/\/.*$//' )" | 
#    add the kernel lines: console=ttyS0 console=tty1. Get this to work; tried manually but perhaps devuan doesn't use console the same way?

d-i debian-installer/country string US
d-i debian-installer/keymap select us
d-i debian-installer/language string en
d-i debian-installer/locale string en_US
d-i localechooser/supported-locales string en_US.UTF-8

d-i keyboard-configuration/layoutcode string us
d-i keyboard-configuration/variantcode string
d-i keyboard-configuration/xkb-keymap select us

d-i netcfg/disable_autoconfig boolean false
d-i netcfg/get_domain string ipa.example.com
d-i netcfg/wireless_wep string
# disable asking for non-free firmware, because this is a vm and has none
d-i hw-detect/load_firmware boolean false

#d-i apt-setup/enable-source-repositories boolean false
# ORIGINAL d-i apt-setup/services-select multiselect security updates, release updates, backported software
d-i apt-setup/contrib boolean true
d-i apt-setup/disable-cdrom-entries boolean true
d-i apt-setup/non-free boolean true
d-i apt-setup/use_mirror boolean true
d-i mirror/country string manual
d-i mirror/http/directory string /devuan
d-i mirror/http/hostname string deb.devuan.org
d-i mirror/http/proxy string
d-i mirror/protocol string http
d-i mirror/suite string testing

d-i apt-setup/cdrom/set-failed boolean false
d-i apt-setup/cdrom/set-first boolean false
d-i apt-setup/cdrom/set-next boolean false

# my repos and ceres
d-i apt-setup/local0/comment string exampledeb
d-i apt-setup/local0/key string http://www.example.com/example/repo/deb/exampledeb.gpg
d-i apt-setup/local0/repository string http://www.example.com/example/repo/deb/ /
d-i apt-setup/local1/comment string devuan-deb
d-i apt-setup/local1/key string http://www.example.com/example/repo/deb/exampledeb.gpg
d-i apt-setup/local1/repository string http://www.example.com/example/repo/devuan-deb/ /
d-i apt-setup/local2/comment string ceres
d-i apt-setup/local2/key string https://pkgmaster.devuan.org/merged/dists/ceres/Release.gpg
d-i apt-setup/local2/repository string http://pkgmaster.devuan.org/merged ceres main contrib non-free
# if for some reason I really need to turn off the gpg key check:
#d-i debian-installer/allow_unauthenticated boolean false

tasksel tasksel/first multiselect standard, ssh-server

# adapted from /mnt/public/Support/Platforms/devuan/devuan.txt, main fluxbox desktop, but for a vm
# no xscreensaver, for a vm.
d-i pkgsel/include string \
   alsamixergui alttab apt-transport-https bgconf bgscripts bgscripts-core \
   cifs-utils curl fluxbox freeipa-client git grub lightdm lightdm-gtk-greeter \
   mlocate net-tools nfs-common ntpdate oddjob-mkhomedir=0.1-1 openssh-server \
   p7zip palemoon palemoon-ublock-origin parted qemu-guest-agent rsync scite \
   screen spice-vdagent strace sudo tcpdump vim vlc volumeicon-alsa waterfox \
   xfce4-terminal xfe xserver-xorg-video-qxl

d-i pkgsel/upgrade select none

popularity-contest popularity-contest/participate boolean true

d-i clock-setup/ntp boolean true
d-i clock-setup/ntp-server string dns1.ipa.example.com
d-i time/zone string America/New_York

# skip grub during main part, because we will do it in late_command
d-i grub-installer/skip boolean true
# these next 2 are experimental
d-i grub-installer/skip-again boolean true
d-i grub-installer/skip-confirm boolean true
d-i grub-installer/confirm_skip boolean true
d-i nobootloader/confirmation_common boolean true

d-i lilo-installer/skip boolean true
#d-i grub-installer/with_other_os boolean true
#d-i grub-installer/only_debian boolean true
#d-i grub-installer/grub2_instead_of_grub_legacy boolean true
#d-i grub-installer/bootdev string /dev/vda
#d-i grub-installer/choose_bootdev select /dev/vda
#grub-installer grub-installer/force-efi-extra-removable boolean false

d-i passwd/root-password password somethingStrongHere
d-i passwd/root-password-again password somethingStrongHere

d-i partman-auto/choose_recipe select home
d-i partman-auto-crypto/erase_disks boolean false
d-i partman-auto/disk string /dev/vda
d-i partman-auto/init_automatically_partition select biggest_free
d-i partman-auto/method string lvm
d-i partman/choose_label string gpt
d-i partman/choose_partition select finish
d-i partman/confirm boolean true
d-i partman/confirm_nooverwrite boolean true
d-i partman/confirm_write_new_label boolean true
d-i partman/default_label string gpt
#d-i partman-lvm/confirm boolean true
d-i partman-lvm/confirm_nooverwrite boolean true
d-i partman-md/confirm_nooverwrite boolean true
#d-i partman/mount_style select uuid
d-i partman-partitioning/confirm_write_new_label boolean true

# Uncomment this to add multiarch configuration for i386
#d-i apt-setup/multiarch string i386

d-i passwd/make-user boolean true
d-i passwd/user-fullname string bgstack15
d-i passwd/username string bgstack15
d-i passwd/user-password-crypted password $6$85aKM2DkiD5g9r3D$zkbcVES1Bzu.b5dBJxklSggEJzswZBlVAyc9LUUIzMA2OLRH2PD2ZWE9Q40Wtw/3OOxDM2nF031hfD4s5LGuG1
d-i passwd/user-default-groups string audio cdrom video

d-i finish-install/reboot_in_progress note
d-i cdrom-detect/eject boolean true

# additional application stuff just in case it works and is useful
# LDAP server URI:
d-i shared/ldapns/ldap-server	string	ldapi:///ipa.example.com

d-i openssh-server/password-authentication	boolean	true
d-i openssh-server/permit-root-login	boolean	false

# Remove consolekit from ceres, which disrupts /boot/grub/local/*mo files, that grub-install wants.
d-i preseed/late_command string in-target apt-get purge -q -y -o Dpkg::Options::="--force-confdef" -o Dpkg::Options::="--force-confold" consolekit exim4\* ; \
   apt-get install -q -y -o Dpkg::Options::="--force-confdef" -o Dpkg::Options::="--force-confold" postfix ; \
   in-target grub-install /dev/vda ; in-target update-grub ; \
   in-target wget http://www.example.com/example/certs/ca-ipa.example.com.crt -O /usr/local/share/ca-certificates/ca-ipa.example.com.crt && update-ca-certificates || : ; \
   in-target su bgstack15 -c "sudo /usr/bin/bgconf.py" 1>/root/clone.log 2>&1 ; \
   in-target sed -i -r -e '/^kernel/s/(\s*console=.{1,7}[0-9])*\s*$/ console=tty0 console=ttyS0/;' /boot/grub/menu.lst ; \
   in-target sed -i -r -e '$aT0:23:respawn:/sbin/getty -L ttyS0 9600 vt100' /etc/inittab
Use virt-install to fully automate the install for CentOS/Fedora with kickstart

Here is my kickstart file for CentOS 7. I deploy VMs into my kvm environment with a oneliner, using this kickstart file.

How I use this

I define a variable, and plug it into the important parts.

vm=c7-04a ; time sudo virt-install -n "${vm}" --memory 2048 \
   --vcpus=1 --os-variant=centos7.0 --accelerate -v \
   --disk path=/var/lib/libvirt/images/"${vm}".qcow2,size=20 \
   -l /mnt/public/Support/SetupsBig/Linux/CentOS-7-x86_64-Minimal-1810.iso \
   --initrd-inject=/mnt/public/Support/Platforms/CentOS7/centos7-ks.cfg \
   --extra-args "ks=file:/centos7-ks.cfg SERVERNAME=${vm} NOTIFYEMAIL=bgstack15@gmail.com" \
   --debug --network type=bridge,source=br0 --noautoconsole

Some thoughts

I had to download the 1810 release of the iso, because there was something wrong with the repos or perhaps files in the previous isos, with how they interacted with either the virtual environment or the network or something. But the CentOS-7-x86_64-minimal-1810.iso was important.
I found the SERVERNAME trick on the Internet. You can iterate over /proc/cmdline and react to values you find there, in the %pre or %post scripts.
You will see that I use my own local repositories for the regular CentOS repos, and I add my own internal one (example/repo/rpm). Obviously you should find a suitable set of repos for your own.
You will also see that I attempt to download my CA certificates at various points. I’m pretty sure the %pre effort fails, because the system is not on the network yet.

Dependencies

The kickstart file

# File: /mnt/public/Support/Platforms/CentOS7/centos7-ks.cfg
# Locations:
#    /mnt/public/Support/Platforms/CentOS7/centos7-ks.cfg
# Author: bgstack15
# Startdate: 2017-06-02
# Title: Kickstart for CentOS 7 for ipa.example.com
# Purpose: To provide an easy installation for VMs and other systems in the Mersey network
# History:
#    2017-06 I learned how to use kickstart files for the RHCSA EX-200 exam
#    2017-08-08 Added notifyemail to --extra-args
#    2017-10-29 major revision to use local repository
#
#
#
#
# Usage with virt-install:
#    vm=c7-04a ; time sudo virt-install -n "${vm}" --memory 2048 --vcpus=1 --os-variant=centos7.0 --accelerate -v --disk path=/var/lib/libvirt/images/"${vm}".qcow2,size=20 -l /mnt/public/Support/SetupsBig/Linux/CentOS-7-x86_64-Minimal-1810.iso --initrd-inject=/mnt/public/Support/Platforms/CentOS7/centos7-ks.cfg --extra-args "ks=file:/centos7-ks.cfg SERVERNAME=${vm} NOTIFYEMAIL=bgstack15@gmail.com" --debug --network type=bridge,source=br0 --noautoconsole
#    vm=c7-04a; sudo virsh destroy "${vm}"; sudo virsh undefine --remove-all-storage "${vm}";
# Reference:
#    https://sysadmin.compxtreme.ro/automatically-set-the-hostname-during-kickstart-installation/
#    /mnt/public/Support/Platforms/CentOS7/install-vm.txt

#platform=x86, AMD64, or Intel EM64T
#version=DEVEL
# Install OS instead of upgrade
install
# Keyboard layouts
keyboard 'us'
# Root password
rootpw --plaintext SOMETHINGSTRONGHERE
# my user
user --groups=wheel --name=bgstack15-local --password=$6$.gh0u7vg2HDPJPX/$g4Y1l.q76fs7i0UK8t6h83bDIo2YnGGj/1DGeUzzbMTd0pBh4of6jNYWxxws/937sUiPgETqPsYFI5XNrkAle. --iscrypted --gecos="bgstack15-local"

# System language
lang en_US.UTF-8
# Firewall configuration
firewall --enabled --ssh
# Reboot after installation
reboot
# Network information
#attempting to put it in the included ks file that accepts hostname from the virsh command.
#network  --bootproto=dhcp --device=eth0 --ipv6=auto --activate
%include /tmp/network.ks
# System timezone
timezone America/New_York --utc
# System authorization information
auth  --useshadow  --passalgo=sha512
# Use network installation instead of CDROM installation media
url --url="http://www.ipa.example.com/mirror/centos/7/os/x86_64/"

# Use text mode install
text
# SELinux configuration
selinux --enforcing
# Do not configure the X Window System
skipx

# Use all local repositories
# Online repos
repo --name=examplerpm --baseurl=https://www.ipa.example.com/example/repo/rpm/
repo --name=base --baseurl=https://www.ipa.example.com/mirror/centos/$releasever/os/$basearch/
repo --name=updates --baseurl=https://www.ipa.example.com/mirror/centos/$releasever/updates/$basearch/
repo --name=extras --baseurl=https://www.ipa.example.com/mirror/centos/$releasever/extras/$basearch/
repo --name=epel --baseurl=https://www.ipa.example.com/mirror/fedora/epel/$releasever/$basearch

# Offline repos
#
#
#
#
#

firstboot --disabled

# System bootloader configuration
bootloader --location=mbr
# Partition clearing information
clearpart --all --initlabel
# Disk partitioning information
autopart --type=lvm

%pre
echo "network  --bootproto=dhcp --device=eth0 --ipv6=auto --activate --hostname renameme.ipa.example.com" > /tmp/network.ks
for x in $( cat /proc/cmdline );
do
   case $x in
      SERVERNAME*)
         eval $x
         echo "network  --bootproto=dhcp --device=eth0 --ipv6=auto --activate --hostname ${SERVERNAME}.ipa.example.com" > /tmp/network.ks
         ;;
      NOTIFYEMAIL*)
         eval $x
         echo "${NOTIFYEMAIL}" > /mnt/sysroot/root/notifyemail.txt
         ;;
   esac
done
cp -p /run/install/repo/ca-ipa.example.com.crt /etc/pki/ca-trust/source/anchors/ 2>/dev/null || :
wget http://www.ipa.example.com/example/certs/ca-ipa.example.com.crt -O /etc/pki/ca-trust/source/anchors/ca-ipa.example-wget.com.crt || :
update-ca-trust || :
%end

%post
(
   # Set temporary hostname
   #hostnamectl set-hostname renameme.ipa.example.com;

   # Get local mirror root ca certificate
   wget http://www.ipa.example.com/example/certs/ca-ipa.example.com.crt -O /etc/pki/ca-trust/source/anchors/ca-ipa.example.com.crt && update-ca-trust

   # Get local mirror repositories
   wget https://www.ipa.example.com/example/repo/rpm/example.repo -O /etc/yum.repos.d/example.repo;
   wget http://www.ipa.example.com/example/repo/rpm/examplerpm.mirrorlist -O /etc/yum.repos.d/examplerpm.mirrorlist
   distro=centos7 ; wget https://www.ipa.example.com/example/repo/mirror/example-bundle-${distro}.repo -O /etc/yum.repos.d/example-bundle-${distro}.repo && grep -oP "(? /boot/grub2/grub.cfg

   # postfix is already started by default on centos7
   # Send IP address to myself
   thisip="$( ifconfig 2>/dev/null | awk '/Bcast|broadcast/{print $2}' | tr -cd '[^0-9\.\n]' | head -n1 )"
   {
      echo "${SERVER} has IP ${thisip}."
      echo "system finished kickstart at $( date "+%Y-%m-%d %T" )";
   } | /usr/share/bgscripts/send.sh -f "root@$( hostname --fqdn )" \
      -h -s "${SERVER} is ${thisip}" $( cat /root/notifyemail.txt 2>/dev/null )

   # No changes to graphical boot
   #

   # fix the mkhomedir problem
   systemctl enable oddjobd.service && systemctl start oddjobd.service

   # Personal customizations
   mkdir -p /mnt/bgstack15 /mnt/public
   su bgstack15-local -c "sudo /usr/share/bgconf/bgconf.py"

) >> /root/install.log 2>&1
%end

%packages
@core
@^minimal
autossh
bc
bgconf
bgscripts-core
bind-utils
cifs-utils
cryptsetup
dosfstools
epel-release
expect
firewalld
git
iotop
ipa-client
-iwl*-firmware
mailx
man
mlocate
net-tools
nfs-utils
ntp
p7zip
parted
policycoreutils-python
rpm-build
rsync
screen
strace
sysstat
tcpdump
telnet
vim
wget
yum-utils
%end

A Devuan guest in kvm and using spice-vdagentd

If you intend to use spice-vdagent in a devuan vm, you might be interested to know how to get the spice agent to actually work.

Symptoms

The option for “Scale Display -> Auto resize VM with window” is not functional in the spice viewer.
In the guest’s /var/log/syslog, you can see an error:

spice-vdagentd: error getting session for pid 2970: no such file or directory free

But that’s about it.

The fix

Make file /etc/default/spice-vdagentd with contents:

SPICE_VDAGENTD_EXTRA_ARGS=-X

Then restart the daemon.

sudo service spice-vdagentd restart

The -X flag on the invocation disables systemd-logind integration. This is key for a devuan install because devuan exists to be free of the requirement for systemd.

References

Internet searches

  1. https://duckduckgo.com/?q=spice-vdagentd%3A+Error+getting+session+for+pid+2970%3A+No+such+file+or+directory

Weblinks

  1. 14.04 – Systemd, cgroup, and LXC – Ask Ubuntu
  2. Bug #1633609 “spice-vdagentd does not work” : Bugs : spice-vdagent package : Ubuntu
  3. Configuration for spice-vdagentd – Ask Ubuntu

Add policykit rules for virt-manager

If a user wants to use virt-man to control virtual machines on localhost, he will be prompted to authenticate to policykit.

If you have a policykit rule established (as the libvirt package already provides) for the right group, it’s seamless. Just make sure the user is in group “libvirt” (from /usr/share/polkit-1/rules.d/50-libvirt.rules)
Or, to make a different group the (additional) accepted value:

tf=/etc/polkit-1/rules.d/80-libvirt.rules
touch "${tf}" ; chmod 0644 "${tf}"
cat <<EOF >"${tf}"
polkit.addRule(function(action, subject) {
  if (action.id == "org.libvirt.unix.manage" && subject.local && subject.active && subject.isInGroup("wheel")) {
      return polkit.Result.YES;
  }
});
EOF

References

Web links

    1. How do I prevent virt-manager from asking for the root password? – Super User

Sysprep for Linux

Named after a famous non-free OS sysprep process, my GNU/Linux sysprep process helps my company when I need to clone existing vms. For some reason my apps teams are incapable of installing their applications again, so they just have me clone the system. I blank it out as much as possible, and then provision it like it’s new.

Deploy the sysprep.sh script to the original server and add a cronjob.

    th=originalserver350
    scp -p /etc/ansible/books/test/sysprep/files/sysprep.sh ${th}:~/
    ssh ${th}
    sudo su -
    /bin/cp -pf /home/*/sysprep.sh /root/sysprep.sh ; chmod 0755 /root/sysprep.sh ; chown root.root /root/sysprep.sh
    tf=/etc/cron.d/00_sysprep.cron
    touch "${tf}" ; chown root.root "${tf}" ; chmod 0600 "${tf}"
    cat <<-EOFCRON 1>"${tf}"
@reboot         root    test ! "\$( hostname -s )" = "$( hostname -s )" && test -e /root/sysprep.sh && sleep 20 && /bin/sh -x /root/sysprep.sh cron 1> /root/intermediate-clone.log 2>&1
EOFCRON
    exit # leave root shell
    exit # leave ssh to original server

Inject the regular server deployment scripts.
Modify the td and tv variables here as needed.

    td=/etc/ansible/books/stable/clone
    tv=RHEL7
    pushd "${td}"
    tar -zc -C /etc/ansible/roles/localization -f /tmp/localizations.tgz files
    scp -p /tmp/localizations.tgz "${th}":~
    popd
    pushd "${td}/files/${tv}"
    scp -p *.sh "${th}":~
    popd
    ssh "${th}"
    sudo su -
    /bin/mv -f /home/bgstack15/*.sh /root/ ; chown root.root /root/*.sh ; chmod 0750 /root/*.sh ;
    tar -zx -C /etc -f /home/*/localizations.tgz ;
    test -e /etc/files && ! test -e /etc/templates && /bin/mv -f /etc/files /etc/templates ;
    chown -R root:root /etc/templates 2>/dev/null ;
    exit # leave root shell
    exit # leave ssh to original server

The cronjob to run the s1_init script will be provided by the intermediate template’s execution of the sysprep script.

Upon cloning the vm, the sysprep script will be executed! Here it is:

#!/bin/sh
# File: sysprep.sh
# Location: /etc/ansible/books/test/sysprep/files/
# Author: bgstack15
# Startdate: 2018-10-11 11:39
# Title: Script that Syspreps an Intermediate Server
# Purpose: Convert an intermediate clone of an existing machine to make it more suitable for use as a VM template
# History:
# Usage:
#    On the intermediate template, run this shell script and then power off the vm.
# Reference:
#    https://www.cyberciti.biz/tips/vmware-linux-lost-eth0-after-cloning-image.html
#    https://unix.stackexchange.com/questions/39370/how-to-reload-udev-rules-without-reboot
# Improve:
# Documentation:

echo "sysprep.sh version 2018-10-12b"

# make verbose
set -x

export PATH=/usr/local/bin:/usr/bin:/bin:/usr/local/sbin:/usr/sbin:/sbin

# continue only if hostname indicates this is an intermediate template
hostname -s | grep -qiE 'tmp$' || exit 0

# clean up cronjob so this script is only called that very first boot of the intermediate template
/bin/rm -f /etc/cron.d/00_sysprep.cron

# prepare cronjob for s1_init for a normal clone deployment
# this is mostly for the eth0 renaming again
tf=/etc/cron.d/01_init.cron
touch "${tf}" ; chown root.root "${tf}" ; chmod 0600 "${tf}"
cat <<-EOFCRON 1>"${tf}"
@reboot         root    test ! "\$( hostname -s )" = "$( hostname -s )" && test -e /root/s1_init.sh && /bin/sh -x /root/s1_init.sh cron 1> /root/clone.log 2>&1
EOFCRON

# fix rootsh
this_rootsh="$( which rootsh 2>/dev/null )"
tf=/usr/local/bin/root
touch "${tf}" ; chmod 0755 "${tf}" ; chown root.root "${tf}"
cat < "${tf}"
if test "\$USER" = "root" ; then
  shift
  \$@
else
  /usr/bin/sudo ${this_rootsh:-/usr/local/bin/rootsh} \$@ --no-syslog
fi
EOF

# disable domain connectivity
/bin/rm -f /etc/krb5.keytab /etc/krb5.conf*
service sssd stop ; systemctl stop sssd.service ;
chkconfig sssd off ; systemctl disable sssd.service ;

# disable monitoring
for ts in ccmexecd scx-cimd ;
do
   service "${ts}" stop ; systemctl stop "${ts}.service"
   chkconfig "${ts}" off ; systemctl disable "${ts}.service"
done
# remove old ssl certificates
rm -f /etc/opt/microsoft/scx/ssl/*

# clean old log and config files
pushd /var/log
rm -f boot.log* btmp* cron* dmesg* dracut* maillog* messages* prepatch/* rootsh/* sa/* samba/* secure* spooler/* sssd/* syslog* vmware-* wtmp*
popd
pushd /root
rm -f core* *.ansible_backup KASetup*log log.*.txt VMwareTools*gz
rm -rf vmware-tools-distrib
popd
pushd /etc
rm -f *.cfsaved fstab.* fstab-* hosts.20*
popd
# clean ansible bupped files
rm -f *.20*@*~
# clean homedirs and bash histories
find /home -maxdepth 1 -mindepth 1 ! -name 'ansible' ! -name 'bgstack15' -exec rm -rf {} \;
for tf in /home/*/.bash_history ;
do
   cat /dev/null | tee "${tf}"
done

# fix networking, rhel6 on vmware
# from project clone RHEL6/s1_init.sh
nic_count="$( ip -o l | grep -cE 'eth[0-9]' )"
this_nic="$( ip -o l | grep -oE 'eth[0-9]' | sort | tail -n1 )"
out_nic=eth0
out_nic_file="/etc/sysconfig/network-scripts/ifcfg-${out_nic}"
this_nic_file="/etc/sysconfig/network-scripts/ifcfg-${this_nic}"
test "${nic_count}" -eq 1 && test "${this_nic}" != "${out_nic}" && {
   sed -i -r -e "s/${this_nic}/${out_nic}/g;" "${this_nic_file}" 2>/dev/null
   sed -i -r -e "s/${this_nic}/${out_nic}/g;" "${out_nic_file}" 2>/dev/null
   test -e "${this_nic_file}" && /bin/mv -f "${this_nic_file}" "${out_nic_file}"
}
/bin/rm -f /etc/udev/rules.d/70-persistent-net.rules
udevadm control --reload-rules && udevadm trigger
# the change will take effect upon next reboot

# fix iptables rule tied to eth0
sed -i -r -e '/dport 1270/s/-i eth[0-9]* //;' /etc/sysconfig/iptables

# generate new ssh host keys
# but this will also happen in the s1_init script
/bin/rm -rf /etc/ssh/*key*
# but do not actually generate them, because this is still just the intermediate template
#/sbin/service sshd stop ; /bin/sleep 5 ; /sbin/service sshd start ;

# clean up old sudoers backups
rm -f /etc/sudoers.20* /etc/sudoers.cf* /etc/sudoers.rpm* /etc/sudoers.d/disable_requiretty.*

# when this process is verified, the template should shut itself down
shutdown -h now ; systemctl poweroff ;

Instructions for Setting Up a CentOS 7 System with Bridged Networking for Virtual Machines

CentOS 7 bridging network card for virtual machines

My goal is to set up virtualization where the guests can access the entire LAN as well as the host over the network. The host should also be able to reach all the guests via the network.

This task was so simple, but somehow it eluded me for over a year. I use this document to establish a new kvm host in my network pool.

Install virtualization tools

sudo yum -y install libvirt qemu-kvm virt-install
sudo systemctl enable libvirtd.service ; sudo systemctl start libvirtd.service
sudo setsebool -P virt_use_nfs 1

Adjust the ethernet configuration

sudo su -
{
this_nic="$( nmcli device show | awk '/^GENERAL.DEVICE:/ && $2 ~ /e.*/ {print $2}' )"
indir=/etc/sysconfig/network-scripts
this_bridge=br0
this_nic_count="$( printf "%s\n" "${this_nic}" | sed '/^\s*$/d' | wc -l )"
if test ${this_nic_count} -ne 1 ;
then
   echo "Other than 1 nic detected. Please deal with manually. Aborted."
else
   # prepare values for bridge definition
   this_mac="$( ip -o link | grep "${this_nic}" | grep -oE 'ether [a-fA-F0-9:]{17}' | awk '{print $2}' | tr '[[:lower:]]' '[[:upper:]]' )"
   this_ipaddr="$( ip -o address show "${this_nic}" | grep -oE 'inet [0-9\.]{7,15}' | awk '{print $2}' )"
   # define bridge interface
   {
      echo "DEVICE=${this_bridge}"
      echo "TYPE=Bridge"
      echo "ONBOOT=yes"
      echo "DELAY=0"
      grep -h -E 'DNS1|DNS2|DOMAIN|IPADDR|PREFIX|BOOTPROTO|GATEWAY|DEFROUTE' "${indir}/ifcfg-${this_nic}"
   } > "${indir}/ifcfg-${this_bridge}"
   # define ethernet card
   old_nic_file="${indir}/ifcfg-${this_nic}"
   temp_nic_file="${indir}/ifcfg-${this_nic}-new"
   {
      echo "DEVICE=${this_nic}"
      echo "HWADDR=${this_mac}"
      echo "ONBOOT=yes"
      echo "BRIDGE=${this_bridge}"
      grep -h -E 'UUID' "${old_nic_file}"
   } > "${temp_nic_file}"
   chmod --reference "${old_nic_file}" "${temp_nic_file}"
   /bin/mv -f "${temp_nic_file}" "${old_nic_file}"
fi
}

systemctl restart network.service NetworkManager.service

Using the virtual host

With the setup complete, the environment is ready to serve virtual machines!

Install a virtual machine

vm=c7-03a ; time sudo virt-install -n "${vm}" --memory 2048 --vcpus=1 --os-variant=centos7.0 --accelerate -v --disk path=/var/lib/libvirt/images/"${vm}".qcow2,size=20 -l /mnt/public/Support/SetupsBig/Linux/CentOS-7-x86_64-Minimal-1804.iso --initrd-inject=/mnt/public/Support/Platforms/CentOS7/centos7-ks.cfg --extra-args "ks=file:/centos7-ks.cfg SERVERNAME=${vm} NOTIFYEMAIL=bgstack15@ipa.example.com" --debug --network type=bridge,source=br0 --noautoconsole

Delete a virtual machine

vm=c7-03a; sudo virsh destroy "${vm}"; sudo virsh undefine --remove-all-storage "${vm}";

References

Weblinks

  1. https://wiki.libvirt.org/page/Networking

Internal files

  1. file:///mnt/public/Support/Platforms/CentOS7/centos7-ks.cfg

Multiple monitors on Windows guest in KVM

Introduction

It is easy to set up a virtual machine with the virt-manager GUI.

To add a second monitor (or more) is also pretty easy, once you know how to do it. However, to view a second monitor simultaneously with the first, you will need to use the tool remote-viewer.

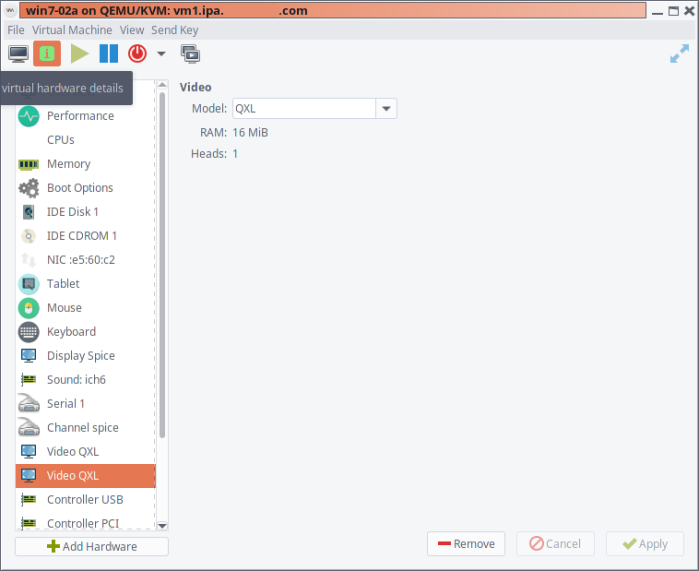
In virt-manager, select “Show virtual hardware details.”
Screenshot of virt-manager open to a virtual machine, "Show virtual hardware details" page.
Add a new video card. A basic QXL type should be sufficient.

It is possible to connect to the guest’s displays over the network, if you configure it to be possible. For example, you use your desktop Virtual Machine Manager to connect to a server’s libvirt via a connection string like qemu+ssh://root@vm1.ipa.example.com/system.

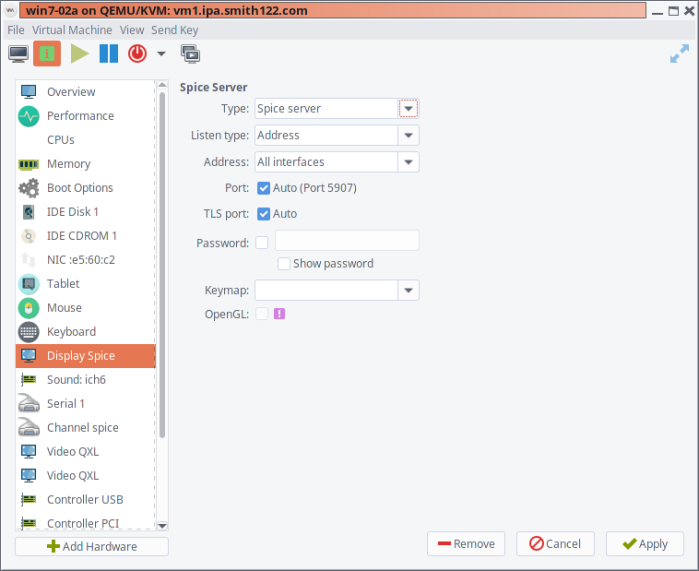
On that virtual machine’s “Display spice” virtual hardware, modify the address tag to “All interfaces.” Also note the the port number given to this guest. In my screenshot you can see mine is port 5907.
Screenshot showing vm settings for display spice

You will want to open up the firewall on the vm host. I suggest just using the vdsm definition, which is for the oVirt project and includes TCP ports 5900-6923.

sudo firewall-cmd --permanent --add-service=vdsm; sudo firewall-cmd --reload

You will need to shut down (not reboot) the guest if it is running at the time, for it to be able to use the new virtual hardware or pretty much any new setting.

Once the virtual machine is running again, use “Remote Viewer” in the GUI, or run from the command line.

remote-viewer spice://vm1.ipa.example.com:5907

Improvements

Learn how to do this in the cli, including maybe at the virt-install statement. Or at least how to retro-fit an existing domain.

References

  1. search “kvm spice guest windows multiple monitors”
  2. Shamelessly ripped off from https://solus-project.com/forums/viewtopic.php?f=11&t=8663
  3. spice guest tools https://www.spice-space.org/download.html

Linux get vmware tools version

$( { find /sbin /usr/sbin /usr/local/bin /bin /usr/bin -name 'vmtoolsd'; echo /bin/true; } | head -n1 ) -v

Regardless of deployment method (RHEL6 by inserting the virtual disc, or RHEL7 rpm for open-vm-tools), this should work for you.

Update on 2019-08-20

And from PowerCLI:

get-vm | % { get-view $_.id } | select Name, @{ Name="ToolsVersion"; Expression={$_.config.tools.toolsVersion}},@{ Name="ToolStatus"; Expression={$_.Guest.ToolsVersionStatus}}

References

  1. Original research
  2. Powercli – How to get Vmware tools version – Virtual Me